Hello!
I am your New Sliq Card
Watch Me to learn more about the technology that allows Sliq to be so sleek.
Thank you for choosing Sliq. Follow the steps below to activate Me.
Step 1
Register for an account with Sliq Online. This is a very quick process, Sliq Online is your online tool to create your Sliq masterpiece. It is also FREE to use but there are some PRO subscription tiers with extra features if you need them.
MAKE SURE YOU COME BACK TO COMPLETE STEPS 2 & 3 AFTER REGISTRATION.
SIMPLY TAP OR SCAN ME AGAIN TO GET BACK HERE.
Step 2
Decide your Sliq Path
Now that you are registered. You need to decide what you want anyone that interacts with ME via a tap or scan to see. You have choices between a customisable Sliq page, a Contact Card Page or an Events Page. Choose wisely.
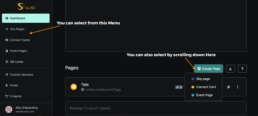
You can normally make a selection in the Sliq Online Menu or scrolling down to “Create New” on your Dashboard. Don’t worry, the Dashboard is the first page you open after logging in.
You will be asked to enter a custom code to link ME to a page as you create them on Sliq Online. You should normally get this in your card box or sent via email to your registered address.
Just making sure we are both on the right page
Step 3
Depending on which path you select, you get different options. Check below on examples of creating a Contact Card Page and a Sliq Page.
UPDATE: YOU NOW HAVE ACCESS TO DIFFERENT TEMPLATES TO ASSIST YOU TO BUILD YOUR UNIQUE SLIQ EXPERIENCE
Contact Card Page
This is a very easy to use interface. All you need to do is to simply enter the contact details that you want to share and update. You also have a lot of advanced options that you are free to use if enabled on your account.
Sliq Page
This is where the power of Sliq Online resides. You will be able to create stunning, diverse and mind blowing designs using what we call Sliq Blocks. Let your Sliq Page stand out when you share information.
YOUR ONLY LIMIT IS YOUR IMAGINATION
That's It. You are Good to Go. Enjoy Using Your New Sliq Card